SWEET
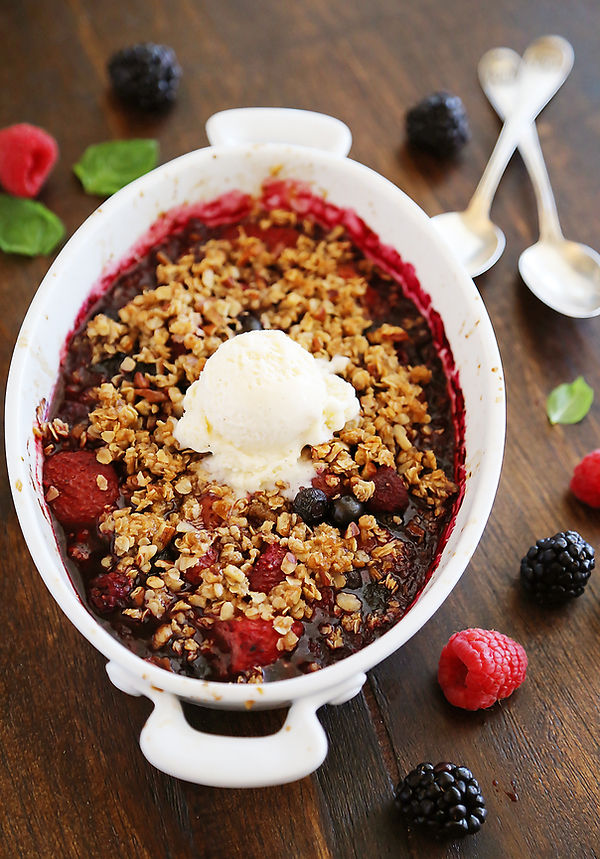
blackberry cobbler crumble
July 24, 2022
An easy blackberry cobbler recipe mixed with a traditional crumble. It’s not too sweet, very easy to make and perfect for a summer evening dessert!
If you decide to recreate this Blackberry Cobbler Crumble recipe, tag me @katherinemcquade on Instagram and use the #KetchupWithKatherine! I would love the support and the opportunity to share your delicious dishes!
Don't forget donate to my program "Promoting Hope: Potholders for Pancreatic Cancer Awareness" and I will send you a set of personalized potholders to use in your kitchen! Email me at info@katherinemcquade.com for all the details!
Happy Baking!
xoxo, Katherine
INGREDIENTS:
5 cups fresh blackberries
3 tbsp self rising flour
2 tsp lemon zest
2 cups sugar, divided 1 cup
1/4 tsp salt
2½ cups self rising flour
12 tbsp butter, cubed
2 large eggs
3 tsp vanilla
INSTRUCTIONS:
Blackberry Filling:
Using a pie plate or a large tart dish (we used a 13” round, 2” high) place thoroughly washed berries on the bottom.
In a small bowl combine 1 cup of the sugar sugar (you'll have 1 cup remaining to use later) and lemon zest and mix with your hands to infuse the sugar with lemon. Add in 3 tablespoons self rising flour and lightly mix.
Add the mixturw to the blackberries and lightly mix. Set aside to make the crumble for the top.
Crumble:
To make the crumble combine flour, the remaining sugar and salt and lightly mix.
Add in chunks of cold butter and use a pastry cutter or fork to blend into pea size crumble.
Whisk the eggs and vanilla together and add to the flour, continue mixing until the dough holds together, but still crumbles.
Evenly sprinkle the crumble on top of the blackberries until they’re all covered.
Bake in a 375 degree oven for 40 minutes until golden brown.
Serve with vanilla ice cream and a glass of White Merlot.
watermelon popsicles
June 1, 2022
Hello Sweet Summertime! One of my favorite desserts are Watermelon Popsicles during the summer season! So light, refreshing and a perfect Summer treat! Keep reading to learn more!
If you decide to recreate this Watermelon Popsicle recipe, tag me @katherinemcquade on Instagram and use the #KetchupWithKatherine! I would love the support and the opportunity to share your delicious dishes!
Don't forget donate to my program "Promoting Hope: Potholders for Pancreatic Cancer Awareness" and I will send you a set of personalized potholders to use in your kitchen! Email me at info@katherinemcquade.com for all the details!
Happy Baking!
xoxo, Katherine

INGREDIENTS:
3 ½ cups cubed watermelon
5 ½ tablespoons sugar, divided
1 tablespoon lemon juice
½ cup canned coconut milk, well shaken
6 medium kiwi fruits
1 tablespoon mini chocolate chips
INSTRUCTIONS:
Add watermelon, 2 tablespoons of sugar and lemon juice to a blender and blend until well pureed. Skim off foam and carefully pour into up to 10 popsicle molds filling to about ⅔ full. Cover with the lid and insert the popsicle sticks and freeze for 3 hours. Watermelon juice separates naturally so stir it gently every 30 minutes. Once the juice is slushed, sprinkle chocolate chips over the tops and push gently down to immerse, keeping some touching the insides of the molds.
After three hours, whisk coconut milk, 1 ½ tablespoons of sugar until sugar is dissolved and chill 30 minutes. You want a nice pourable consistency after chilling, not too thick. If it thickens too much stir in 1-2 tablespoons of cold water to thin.
Remove popsicles from freezer and pour about a tablespoon of coconut milk into an even layer over the watermelon layer. Return to freezer, uncovered, and chill for at least 45 minutes. Meanwhile, peel the kiwis (or cut tops and scoop out flesh) and transfer the fruit to the blender along with 2 tablespoons of sugar. Pulse until pureed. Pour through a mesh strainer to remove seeds and chill the puree for 30 minutes.
Take popsicles from freezer and top each with kiwi mixture, about a tablespoon each. Return to freezer and chill until popsicles are fully solid, about 2-3 hours.
To remove popsicles from molds, turn tray to the side and run plastic molds under warm water several seconds without letting water touch the kiwi at the top. Then slowly pull from molds.
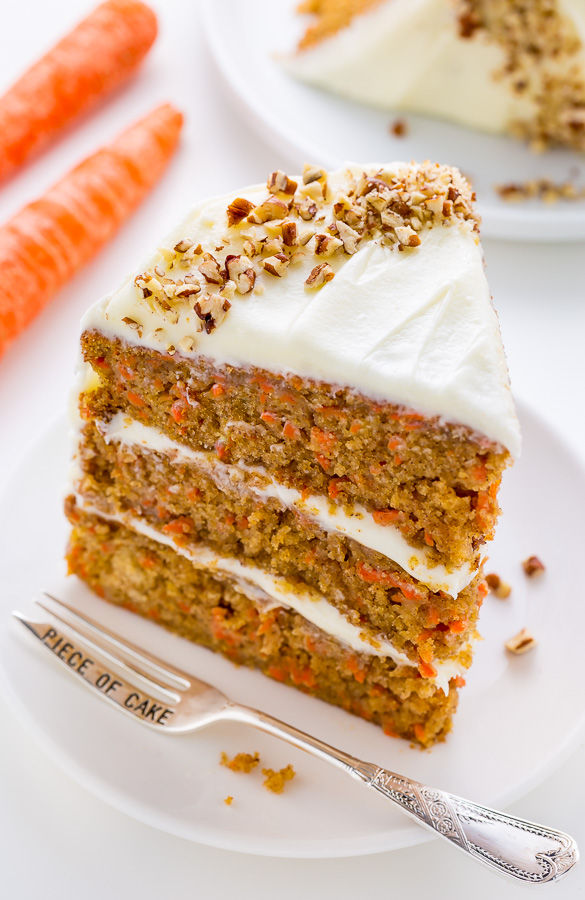
carrot cake
April 17, 2022
Happy Easter Sunday! One of my favorite desserts is Carrot Cake and this recipe is extremely moist, fluffy, and flavorful. Keep reading to learn more!
If you decide to recreate this Carrot Cake recipe, tag me @katherinemcquade on Instagram and use the #KetchupWithKatherine! I would love the support and the opportunity to share your delicious dishes!
Don't forget donate to my program "Promoting Hope: Potholders for Pancreatic Cancer Awareness" and I will send you a set of personalized potholders to use in your kitchen! Email me at info@katherinemcquade.com for all the details!
Happy Baking!
xoxo, Katherine
INGREDIENTS:
For the Carrot Cake:
6 large eggs, at room temperature
2 cups granulated sugar
1 cup light brown sugar, packed
1 and 1/2 cups canola oil (or melted coconut oil)
1 and 1/4 cups unsweetened applesauce
3/4 cup sour cream
1 tablespoon vanilla extract
3 and 1/2 teaspoons ground cinnamon
3/4 teaspoon ground cloves
1/2 teaspoon ground ginger
1 teaspoon ground nutmeg
3 and 3/4 cups all-purpose flour
2 and 1/2 teaspoons baking powder
1 teaspoon baking soda
1/2 teaspoon salt
5 cups coarsely grated carrots
For the Cream Cheese Frosting:
16 ounces full-fat cream cheese, VERY soft
8 ounces unsalted butter, VERY soft
1 tablespoon vanilla pure extract
6 cups confectioners' sugar, sifted, more only if needed
INSTRUCTIONS:
Preheat oven to 350 degrees (F). Cut out three 9-inch round segments of parchment paper to line your cake pans with. Spray each pan generously - sides and bottom - with nonstick cooking spray, then place the parchment paper cut out in the bottom of the pans and spray again. It's important to make sure every bit of pan and paper are sprayed so your cakes don't get stuck. Set pans aside.
In a large bowl combine the eggs, granulated sugar, light brown sugar, oil, applesauce, sour cream, vanilla, and spices; beat well to combine. Add the flour, baking powder, baking soda, and salt to the wet mixture; stir until just combined. Batter will be on the thicker side but resist the urge to over mix! Add in the carrots and using a rubber spatula gently fold together until incorporated.
Divide the batter evenly among the prepared pans, smoothing the top with a spatula. Bake cakes for 35 to 40 minutes, or until the top is golden brown and set, and a toothpick inserted in the center of the cake comes out clean. Allow the cake to cool for 20 minutes in the pan, then transfer it to a wire rack to cool completely.
While the cake is cooling, make your frosting!
For the Cream Cheese Frosting:
In the bowl of a stand-mixer fitted with the paddle attachment, or in a large bowl using an electric handheld mixer, beat the cream cheese, butter, and vanilla on medium-high speed until completely smooth; about 2 minutes.
Reduce the speed to low and gradually add the sifted confectioners' sugar. Once all of the sugar has been added beat on high-speed for 1-2 minutes.
Once the cakes have completely cooled, place one round on a cake stand or large plate; spread the top and sides evenly with frosting. Gently place the second cake layer on top of the frosted one and press down very lightly to seal them together. Repeat with the final cake layer, then continue frosting the cake, using a thin spatula, offset spatula, or whatever you have that works best, until the top and sides of the cake are evenly frosted.
Decorate with additional nuts, if desired, then slice and serve! Store this cake in the fridge, covered, for up to 3 days. Bring to room temperature before serving.
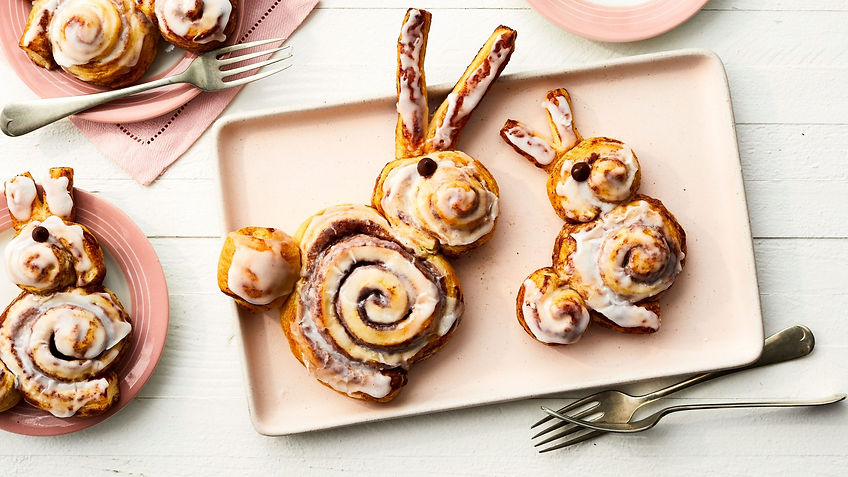
cinnamon bun bunnies
April 1, 2022
And you thought cinnamon rolls couldn't get any sweeter. As if cinnamon rolls weren't sweet enough already, we had to make them that much more irresistible by shaping them into adorable little bunnies.
If you decide to recreate these Cinnamon Bun Bunnies, tag @katherinemcquade on Instagram and use the #KetchupWithKatherine! I would love the support and the opportunity to share your delicious sweet treats!
Don't forget donate to my program "Promoting Hope: Potholders for Pancreatic Cancer Awareness" and I will send you a set of personalized potholders to use in your kitchen! Email me at info@katherinemcquade.com for all the details!
Happy Baking!
xoxo, Katherine
INGREDIENTS:
1 (17.5-oz.) can refrigerated jumbo cinnamon rolls (such as Pillsbury Grands!)
4 semisweet chocolate chips
INSTRUCTIONS:
Preheat oven to 350°F.
Line a large rimmed baking sheet with parchment paper. Separate cinnamon roll dough into 5 rolls.
To create 1 large bunny: Place 1 whole cinnamon roll on prepared baking sheet for the body. Rotate dough so outer spiral of dough is bottom of body and end of cinnamon roll spiral is pointing to the right. (The end of the roll will become the bunny's legs.) Unroll a second cinnamon roll, and cut off one-fourth of dough (about 4 inches), and roll up to form tail. Roll up remaining dough piece to form head, leaving bottom 4 inches unrolled. Cut lengthwise through unrolled portion of head piece to form ears. Rub off any cinnamon coating from tail and head pieces, dab water on dough, and press pieces onto body to attach. Spread out ear strips, and pinch dough at tips to shape.
To create 3 small bunnies: Unroll 1 unbaked cinnamon roll, and cut dough in half crosswise (each piece will be about 8 inches). Roll up 1 piece to form body. Place on prepared baking sheet, and rotate dough so outer spiral of dough is bottom of body and end of cinnamon roll spiral is pointing to the right. (The end of the roll will become the bunny's legs.) Cut off one-third of remaining piece (about 3 inches), and roll up to form tail. Roll up remaining dough piece (about 5 inches) to form head, leaving bottom 2 inches unrolled. Cut lengthwise through unrolled portion of head piece. Rub off any cinnamon coating from tail and head pieces, dab water on dough, and press pieces onto body to attach. Spread out ear strips, and pinch dough at tips to shape. Repeat twice with remaining cinnamon rolls.
Bake in preheated oven until rolls are golden brown and cooked through, 13 to 15 minutes. Let cool on baking sheet 5 minutes. Evenly spread icing from can over warm rolls. Place 1 chocolate chip on each bunny where eye would be.
coconut macaroon nests
March 20, 2022
Happy Spring! These Coconut Macaroons shaped into nests and garnished with candy eggs are a delicious, sweet, and easy dessert!
To make them, coconut is mixed with egg whites and a touch of extra sweetness. Tucked and pressed into mini muffin pans to resemble mini nests, they are quickly baked until perfectly browned.
Once they’ve cooled, you add a touch of melted white chocolate to each nest as “glue” and then tuck in a few candy eggs for color and crunch.
You can use any type of candy egg you prefer: candy coated chocolate eggs, jelly beans, Jordan almonds, or malted-milk eggs, to name a few options. I filled some of my nests with jelly beans and some with malted-milk eggs. After all, variety is the spice of life!
If you decide to recreate this Coconut Macaroon Nests recipe, tag me @katherinemcquade on Instagram and use the #KetchupWithKatherine! I would love the support and the opportunity to share your delicious dishes!
Don't forget donate to my program "Promoting Hope: Potholders for Pancreatic Cancer Awareness" and I will send you a set of personalized potholders to use in your kitchen! Email me at info@katherinemcquade.com for all the details!
Happy Baking!
xoxo, Katherine

matcha cookies
March 17, 2022
Matcha Cookies are one of my favorites! Super chewy yet soft and the matcha flavor is perfect touch!
If you decide to recreate this Matcha Cookie recipe, tag me @katherinemcquade on Instagram and use the #KetchupWithKatherine! I would love the support and the opportunity to share your delicious dishes!
Don't forget donate to my program "Promoting Hope: Potholders for Pancreatic Cancer Awareness" and I will send you a set of personalized potholders to use in your kitchen! Email me at info@katherinemcquade.com for all the details!
Happy Baking!
xoxo, Katherine


INGREDIENTS:
2 cups all purpose flour
1 tsp baking soda
½ tsp salt
1 tbsp matcha powder
1 cup unsalted butter
½ cup granulated sugar
1 cup brown sugar
1 tsp vanilla extract
2 eggs room temperature
1 cup white chocolate chips
INSTRUCTIONS:
Preheat oven to 350 degrees F.
Brown your butter. Heat your butter over medium heat until it turns a golden yellow color. Pour butter in a heat proof bowl to cool. As the butter cools, it will get darker in color.
Combine flour, baking soda, salt, and matcha powder in a medium size mixing bowl. Mix well and set aside.
Next add in white sugar and brown sugar to your butter. Mix to combine. Once well combined, add in your eggs and vanilla. Whisk together. Whisk until you get a light and creamy texture (1 minute). This is the key to getting a crisp and chewy cookie.
Once the wet ingredients are well mixed, slowly add in the dry ingredients from step 3. Combine with a spatula until a green dough forms.
Add in the white chocolate chips and mix until they are well incorporated.
Let the dough rest at room temperature for 30 minutes.
Cover 2 baking sheets with parchment paper. Use a 3 tablespoon (1.5 oz) ice cream scoop to scoop cookie dough onto baking sheets. Cookies should be 2-3 inches apart.
Bake for 9-11 minutes.
Let cookies cool for 10 minutes before putting them on a cooling rack.
Cool cookies for another 15 minutes before serving.
sweet strawberry shortcake cups
February 6, 2022
Sweet Strawberry Shortcake Cups are as beautiful as they are delicious. These tiny trifles are such a fun and tasty way to enjoy Love Day! With a delicious mix of fresh strawberries, chocolate, cream, and pound cake, they're pint-sized perfection!
If you decide to recreate my Sweet Strawberry Shortcake Cups, tag me @katherinemcquade on Instagram and use the #KetchupWithKatherine! I would love the support and the opportunity to share your delicious dishes!
Don't forget donate to my program "Promoting Hope: Potholders for Pancreatic Cancer Awareness" and I will send you a set of personalized potholders to use in your kitchen! Email me at info@katherinemcquade.com for all the details!
Happy Baking!
xoxo, Katherine

INGREDIENTS:
6 ounces low-fat cream cheese (softened)
1 1/2 cups powdered sugar
4 ounces white chocolate melted
1 teaspoon vanilla extract or 1 1/2 t vanilla bean paste
8 ounces frozen whipped topping, thawed such as Cool Whip
2 pints fresh strawberries washed and sliced into small pieces
4 ounces strawberry glaze sugar free or regular
2 ounces heavy cream
4 ounces white chocolate cut into small pieces
32 ounces pound cake cubed (2 16-ounce loaves)
INSTRUCTIONS:
Combine:
Beat cream cheese until light and smooth.
Add powdered sugar, melted chocolate, and vanilla.
Fold in whipped topping and set aside.
For the Glaze:
Macerate the strawberries by adding sugar, stirring, and letting stand for at least 3-4 minutes.
Add strawberry glaze and mix well; set aside.
For the Ganache:
Heat heavy cream in a small saucepan until simmering.
Remove from heat and pour over chopped white chocolate, stirring until chocolate is completely melted.
Allow to cool, stirring occasionally. Make sure it is cooled to room temperature before proceeding. If the mixture is too hot it will soak into the cake layer.
To Assemble the Trifles:
Place a large spoonful of filling into the bottom of the cup
Using a slotted spoon, top with a large spoonful of the strawberry glaze mixture.
Dip 6-8 cubes of pound cake into the ganache and place on top of the strawberries. The ganache will keep the cake from getting soggy from the glaze mixture.
Top with another large spoonful of the filling.
Finish the trifle with another heaping spoonful of the strawberry glaze mixture.
homemade apple pie
September 14, 2021
September means apple picking! I love a classic, Apple Pie! This recipe is easy and delicious! Keep reading to discover more!
I hope you enjoy this recipe! If you decide to recreate this Apple Pie recipe, tag me @katherinemcquade on Instagram and use the #KetchupWithKatherine! I would love the support and the opportunity to share your delicious dishes!
Don't forget donate to my program "Promoting Hope: Potholders for Pancreatic Cancer Awareness" and I will send you a set of personalized potholders to use in your kitchen! Email me at info@katherinemcquade.com for all the details!
Happy Baking!
xoxo, Katherine

INGREDIENTS:
1 recipe for double pie crust
2 1/4 lbs Granny Smith Apples, peeled, cored 6-7 apples (7 cups thinly sliced)
1 1/2 tsp cinnamon
8 Tbsp unsalted butter
3 Tbsp all-purpose flour
1/4 cup water
1 cup granulated sugar
1 egg + 1 Tbsp water, for egg wash
INSTRUCTIONS:
Preheat oven to 425˚F. Melt butter in a medium saucepan over medium heat. Whisk in 3 Tbsp flour then simmer for 1 minute, whisking constantly.
Whisk in 1/4 cup water, 1 cup sugar and bring to a boil. Reduce heat and continue simmering 3 minutes, whisking frequently then remove from heat. Peel, remove cores and thinly slice 7 cups of apples and place them in a large bowl.
Sprinkle the top with 1 1/2 tsp cinnamon and toss to combine. Pour the sauce over the apples and stir to coat the apple slices. Sprinkle your work surface with flour and roll out bottom pie crust to a 12" diameter circle. Wrap it around your rolling pin to transfer it to the 9" pie plate. Add apple mixture, mounding slightly in the center and being careful not to get the filling on the edges which would make it difficult to seal.
Roll second crust into an 11" round and cut into 10 even thickness strips using a pizza cutter. Arrange strips in a woven lattice pattern over the top (see video tutorial). Beat together 1 egg and 1 Tbsp water and brush the top with egg mixture.
Bake at 425˚F for 15 minutes. Reduce the heat to 350˚F and continue baking another 45 minutes or until apples are soft and filling is bubbling through the vents. Rest at room temp 1 hour before serving.
matcha tea lemonade
August 8, 2021
Easy, peezy, lemon, squeezy! I am currently obsessed with Starbucks' Matcha Tea Lemonade... so why not make at home!
I hope you enjoy this recipe! If you decide to recreate this at home Matcha Tea Lemonade recipe, tag me @katherinemcquade on Instagram and use the #KetchupWithKatherine! I would love the support and the opportunity to share your delicious dishes!
Don't forget donate to my program "Promoting Hope: Potholders for Pancreatic Cancer Awareness" and I will send you a set of personalized potholders to use in your kitchen! Email me at info@katherinemcquade.com for all the details!
Happy Baking!
xoxo, Katherine
INGREDIENTS:
Matcha Green Tea Powder
Honey
Lemon Juice
Water & Ice
INSTRUCTIONS:
Add the hot water to a small bowl and sift the matcha powder over the water. Using a bamboo matcha whisk, whisk the mixture well until thick paste forms and the matcha dissolves. Set aside and allow to cool.
Add the cold water, lemon juice, and honey to a pitcher and stir well to combine. Pour in the matcha mixture and stir.
Fill two large glasses about halfway with ice and pour the matcha lemonade over the ice. & Enjoy! :)

lemon bars
June 16, 2021
Easy, peezy, lemon, squeezy! These Lemon Bars are SO good! This recipe has the most wonderful ratio of crust to lemon filling – they compliment each other without overpowering one another.
I hope you enjoy this recipe! If you decide to recreate this Lemon Bar recipe, tag me @katherinemcquade on Instagram and use the #KetchupWithKatherine! I would love the support and the opportunity to share your delicious dishes!
Don't forget donate to my program "Promoting Hope: Potholders for Pancreatic Cancer Awareness" and I will send you a set of personalized potholders to use in your kitchen! Email me at info@katherinemcquade.com for all the details!
Happy Baking!
xoxo, Katherine

INGREDIENTS:
Crust:
2 cups + 2 tbsp (276g) all-purpose flour
1 cup (115g) powdered sugar
1/2 tsp salt
1 tsp vanilla
1 cup (224g) unsalted butter, melted
Filling:
2 1/2 cups (518g) granulated sugar
1/2 cup (65g) all-purpose flour
7 large eggs
1 cup (240ml) fresh lemon juice (4-5 lemons)
Pinch salt
INSTRUCTIONS:
Prepare Pan for Baking:
Preheat your oven to 350 degrees and line the bottom and sides of a 9×13 baking pan with parchment paper that sticks up above the sides of the pan. This will help you remove the bars later for easy cutting. Set the pan aside.
Make Your Crust:
Combine the flour, powdered sugar and salt in a medium bowl. Add the melted butter & vanilla extract and stir to combine completely.
Assemble Crust:
Crumble and distribute your crust over the bottom of the pan and press it evenly into the bottom.
Bake:
Bake the crust for 15-20 minutes, or until the edges are just getting lightly browned. Remove from the oven and set aside.
Make Your Filling:
Combine the sugar and flour in a bowl. Add the eggs, lemon juice & salt and whisk together to combine. Don’t over mix.
Bake & Let Cool:
Pour the filling on top of the crust and bake for 18-22 minutes, or until relatively set. Remove from the oven and cool for 15-20 minutes on the counter, then refrigerate until cold and firm.
Assemble Your Dessert:
Remove bars from the pan and dust with powdered sugar, then cut into squares and serve!
skin glowing smoothie
May 24, 2021
Summer is finally here! If you want clear & glowing skin this summer, check out my power green smoothie! So tasty & good of you!
1 1/2 cup of coconut milk
2 cups spinach
1 banana (frozen is best)
1 apple sliced into pieces
1/4 avocado
Blend & Enjoy! :)
I hope you enjoy this recipe! If you decide to recreate this Skin Glowing Smoothie recipe, tag me @katherinemcquade on Instagram and use the #KetchupWithKatherine! I would love the support and the opportunity to share your sweet treats!
Don't forget donate to my program "Promoting Hope: Potholders for Pancreatic Cancer Awareness" and I will send you a set of personalized potholders to use in your kitchen! Email me at info@katherinemcquade.com for all the details!
Happy Baking!
xoxo, Katherine

mint swirl brownies
March 2, 2021
Hello March! Want something... Swirly, twirly, fudgy, minty, and cheesecake goodness. You have come to the right place! Keep reading to discover these Mint Swirl Brownies!
I hope you enjoy this recipe! If you decide to recreate this Mint Swirl Brownies recipe, tag me @katherinemcquade on Instagram and use the #KetchupWithKatherine! I would love the support and the opportunity to share your sweet treats!
Don't forget donate to my program "Promoting Hope: Potholders for Pancreatic Cancer Awareness" and I will send you a set of personalized potholders to use in your kitchen! Email me at info@katherinemcquade.com for all the details!
Happy Cooking!
xoxo, Katherine

INGREDIENTS:
FUDGE BROWNIES
1/2 cup (1 stick or 115g) salted butter
8 ounces coarsely chopped semi-sweet chocolate
1 and 1/4 cups (250g) granulated sugar
3 large eggs
1 teaspoon pure vanilla extract
3/4 cup (95g) all-purpose flour(spoon & leveled)
1/4 teaspoon salt
MINT CHEESECAKE LAYER
8 ounces (224g) cream cheese, softened to room temperature
1/4 cup (50g) granulated sugar
1 egg yolk
1/4 teaspoon peppermint extract*
2 drops liquid or gel green food coloring*
2/3 cup (120g) mini chocolate chips
INSTRUCTIONS:
Adjust the oven rack to the lower third position and preheat the oven to 350°F (177°C). Line the bottom and sides of an 11 x 7 inch baking pan with aluminum foil, leaving an overhang on all sides. Set aside. Set out 8 ounces of cream cheese for the cheesecake layer and allow to soften as you prepare the brownies.
Make the brownies first: Melt butter and semi-sweet chocolate in a medium saucepan on medium heat, stirring constantly (about 6 minutes). Remove from heat and let cool to room temperature (about 15 minutes). You may also stick the chocolate/butter mixture into the refrigerator to cool to room temperature quicker.
Stir sugar into cooled chocolate/butter mixture until combined. Add in the eggs one at a time, whisking until smooth after each addition. Whisk in the vanilla. Gently fold in the flour and salt. Pour batter into prepared pan, reserving 1/4 cup of batter.
Make the cheesecake swirl: With a hand-held mixer on medium speed, beat the softened cream cheese, 1/4 cup sugar, egg yolk, 1/4 teaspoon peppermint extract, and 2 drops of food coloring in a medium bowl until completely smooth – about 1 minute. Manually stir in the mini chocolate chips. Dollop spoonfuls of the cream cheese mixture on top of the prepared brownie batter. Cover with the last 1/4 cup of brownie batter. Glide a knife through the layers, creating a swirl pattern. Add more mini chocolate chips on top, if desired.
Bake brownies for 30-35 minutes, or until a toothpick comes out almost clean. Check them at the 30 minute mark to be sure. Allow brownies to cool completely before cutting into squares. Brownies stay fresh stored in the refrigerator for 1 week.
pink champagne cupcakes
February 14, 2021
It's the shortest month but love is in the air! Say "I love you" with Pink Champagne Cupcakes! So light, fluffy and so cute!!
I hope you enjoy this recipe! If you decide to recreate this Pink Champagne Cupcake recipe, tag me @katherinemcquade on Instagram and use the #KetchupWithKatherine! I would love the support and the opportunity to share your sweet treats!
Don't forget donate to my program "Promoting Hope: Potholders for Pancreatic Cancer Awareness" and I will send you a set of personalized potholders to use in your kitchen! Email me at info@katherinemcquade.com for all the details!
Happy Cooking!
xoxo, Katherine


INGREDIENTS:
1 box white cake mix
1 cup pink champagne reduce
1/3 cup vegetable oil
3 eggs
pink food coloring
INSTRUCTIONS:
Preheat the oven to 325 degrees. Line a cupcake baking tray with paper liners and set aside.
In a small saucepan over medium heat, add 2 cups Pink Champagne and simmer until it is reduced to 1 cup liquid, about 6-8 minutes. Set aside until room temperature. Reserve 1-2 Tablespoons to use in buttercream icing.
Combine Cake mix, oil, and eggs together until well blended. Add a drop of pink coloring to the cooled reduced champagne to a light pink and stir well. Add champagne reduction to batter and blend well.
Fill each paper cup ⅔ full and bake at 325 degrees for 18-20 minutes or until toothpick inserted in the center comes out clean.
immunity boosting smoothie
January 1, 2021
HAPPY 2021!
I'm so so so excited! I love the new year! Fresh starts, new opportunities and beautiful beginnings! I'm loving smoothies lately! Here's an Immunity Boosting Smoothie packed with lots of Vitamin C! It was a great orange flavor with a hint of vanilla!
Ingredients:
1 large orange (peeled)
½ medium banana
cup frozen mango pieces
½ cup almond milk
¼ teaspoon vanilla extract
blend & ENJOY!
I hope you enjoy this recipe! If you decide to recreate this recipe, tag me @katherinemcquade on Instagram and use the #KetchupWithKatherine! I would love the support and the opportunity to share your sweet treats!
Don't forget donate to my program "Promoting Hope: Potholders for Pancreatic Cancer Awareness" and I will send you a set of personalized potholders to use in your kitchen! Email me at info@katherinemcquade.com for all the details!
Happy Cooking!
xoxo, Katherine

hot cocoa bombs
December 13, 2020
'Tis the Season!
I love the holidays! The magic of Christmas is in the air, the lights are bright and I love allllll the sweet treats and drinks! The biggest trend right now is Hot Cocoa Bombs! They're pretty easy to make and its a fun family holiday activity!
Keep reading to learn more!


INGREDIENTS:
white chocolate
hot cocoa mix
mini marshmallows
red & green candy canes
half circle chocolate molds
INSTRUCTIONS:
Melt your chocolate
Use the microwave to melt the chocolate melts or chocolate stirring in between until everything is smooth and pourable.
Fill the molds
Scoop some chocolate into the mold and use the back of a spoon or pastry brush to push the melted chocolate around the molds, making it thick enough along the sides and edges. Pop the molds into the freezer for 5-10 minutes to set.
Remove
Gently push the half spheres out of the silicone mold.
Melt the edges
Microwave a microwave safe plate for a minute, you want the plate to be just hot enough to melt the chocolate. Pick up the empty half of the chocolate bomb and place it on the warm plate for a couple of seconds, just until it melts.
Fill
Add 1 tablespoon hot cocoa powder and mini marshmallows (and any other add-ins you want) to half of the spheres. Pick up another half and melt the edge on the warm plate then push the two sides together to seal.
Decorate
Drizzle on some extra chocolate, decorate with crushed cookies, candy, or sprinkles!
gingerbread cookies
December 2, 2020
You know I had to showcase my favorite, go-to Classic Gingerbread Cookie recipe! Made with the warming spices of ginger, nutmeg & cinnamon, not only will they taste so good but your home will smell amazing! Keep reading to learn more!


INGREDIENTS:
Gingerbread Cookies Recipe:
3 1/4 cups all-purpose flour
1 tablespoon ground cinnamon
1 tablespoon ground ginger
3/4 teaspoon baking soda
3/4 teaspoon ground cloves
1/2 teaspoon ground nutmeg
1/2 teaspoon salt
3/4 cup unsalted butter, softened to room temperature
1/2 cup packed brown sugar
1 large egg
1/2 cup unsulfured molasses
1 1/2 teaspoons vanilla extract
(optional) zest of one small orange
optional toppings: simple icing (see below), red hots, sprinkles, etc.
Simple Icing Recipe:
2 cups powdered sugar
2–3 tablespoons milk
1/4 teaspoon vanilla extract
INSTRUCTIONS:
Whisk together your dry ingredients
Flour, cinnamon, ginger, baking soda, cloves, salt and nutmeg.
Beat the dough
Using either a stand mixer or a hand mixer, beat the butter and sugar together until light and fluffy. Add in eggs and molasses, and beat on medium speed until combined. Then gradually add in the flour mixture, and beat on medium-low speed until just combined.
Chill the dough
Divide the dough into two equal portions, and form them each into a ball. Then gently use your hands to flatten each ball into a 1-inch thick disk, wrap tightly in plastic wrap, and chill in the refrigerator for at least 2 hours or overnight. The disc shape will make it easier to roll the cookies out later.
Roll and cut the dough
Once the dough is thoroughly chilled, unwrap one of the disc and place is on a lightly-floured surface. Use a floured rolling pin to roll the dough evenly until it is approximately 1/8-inch thick. Then use your favorite cookie cutters to cut out your desired shapes, re-rolling the dough as needed to cut out more. Transfer the dough shapes to to a parchment-covered baking sheet.
Bake
At 350°F for about 8 to 10 minutes, or until the cookies are crisp around the edges and on top. Remove from oven and let cool for 5 minutes, then transfer to a wire rack to finish cooling.
Decorate
Once the cookies cool to room temperature, feel free to decorate them as desired with the icing (see below) and serve. Then dive in, or transfer them to a sealed container and store (or freeze) for later.
homemade pumpkin spice latte
October 20, 2020
I love a good PSL, who doesn't?
Here's my vegan and dairy free version!
I hope you enjoy this recipe! If you decide to recreate this Homemade Pumpkin Spice Latte recipe, tag me @katherinemcquade on Instagram and use the #KetchupWithKatherine! I would love the support and the opportunity to share your sweet treats!
Don't forget donate to my program "Promoting Hope: Potholders for Pancreatic Cancer Awareness" and I will send you a set of personalized potholders to use in your kitchen! Email me at info@katherinemcquade.com for all the details!
Happy Cooking!
xoxo, Katherine


INGREDIENTS:
1 11-ounce can sweetened, condensed coconut milk
1 cup water
1 cup sugar
2/3 cup pumpkin puree (not pumpkin pie filling)
1 tablespoon pumpkin pie spice
1 teaspoon cinnamon
1 teaspoon vanilla extract
INSTRUCTIONS:
In a large saucepan over medium heat, whisk the sauce ingredients together until smooth. Continue heating and whisking until sugar has completely dissolved.
Remove from heat, use about 1/4 sauce for each latte.
Add your favorite espresso over ice, stir and enjoy!
pumpkin bites
October 6, 2020
I don’t think this recipe needs a caption...
Chocolate
Caramel
PUMPKIN
SO GOOD! Gluten free, dairy free, vegan, and refined sugar free. Super easy to make and perfect for Halloween!
I hope you enjoy this recipe! If you decide to recreate these Pumpkin Bites, tag me @katherinemcquade on Instagram and use the #KetchupWithKatherine! I would love the support and the opportunity to share your sweet treats!
Don't forget donate to my program "Promoting Hope: Potholders for Pancreatic Cancer Awareness" and I will send you a set of personalized potholders to use in your kitchen! Email me at info@katherinemcquade.com for all the details!
Happy Cooking!
xoxo, Katherine

INGREDIENTS:
1 cup chocolate chips
2 tbsp pumpkin puree
3 tbsp almond butter
1/2 tsp cinnamon
1/2 tsp pumpkin spice
1/2 tbsp maple syrup
INSTRUCTIONS:
Melt the chocolate. Pour 1/2 of the chocolate into the mold. I used a pumpkin shaped tray to make these themed, but you can use a basic mold, any shape any size! Make sure to go up the sides of the molds so the filling doesn't spill out. Freeze for about 10 minutes so the chocolate can harden.
Make the filling while the first layer of chocolate is freezing. Mix the rest of the ingredients together in a small bowl and make sure the filling is well mixed!
Fill each cup with the filling to the top.
Cover the filling with the second 1/2 of chocolate, covering the filling super well.
Freeze for an hour!
Remove from the mold and enjoy! Top with a pinch of sea salt (optional) and enjoy!
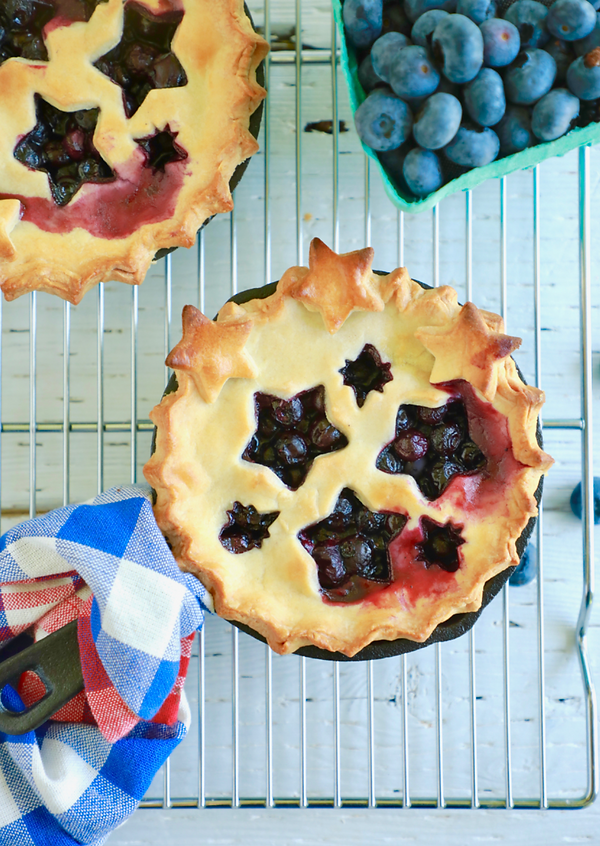
mini star berry pies
July 4, 2020
Celebrate the Fourth of July with Mini Star Berry Pies! These patriotic triple-berry pies are fresh, sweet and perfect for summer!
I hope you enjoy this recipe! If you decide to recreate these Mini Star Berry Pies, tag me @katherinemcquade on Instagram and use the #KetchupWithKatherine! I would love the support and the opportunity to share your sweet treats!
Don't forget donate to my program "Promoting Hope: Potholders for Pancreatic Cancer Awareness" and I will send you a set of personalized potholders to use in your kitchen! Email me at info@katherinemcquade.com for all the details!
Happy Cooking!
xoxo, Katherine

INGREDIENTS:
1 package refrigerated rolled piecrusts
Flour, for work surface
1 large egg, beaten
1/4 cup + 1 tablespoon sugar, divided
1 1/2 cup fresh blueberries
1 1/2 cup fresh chopped strawberries
1 1/4 cup fresh raspberries
1 1/2 tbsp. cornstarch
Pinch kosher salt
Vanilla ice cream, for serving
INSTRUCTIONS:
Working with one piecrust at a time, roll dough on a lightly floured work surface to 1/8-inch thickness. Using the stencil cut out 4 circles; reserve scraps. Repeat with remaining piecrust.
Shape scraps into a 1/2-inch-thick disk. Roll disk on a lightly floured work surface to 1/8-inch thickness. Cut out stars with cookie cutters, re-rolling scraps as necessary.
Transfer dough rounds to pie tins; fold edges under to align with the rim of the tin; crimp. Place pie tins and stars on a baking sheet. Brush edges of dough and stars with egg and sprinkle with 1 tablespoon sugar. Chill 30 minutes.
Heat oven to 375°F. Toss blueberries, strawberries, raspberries, cornstarch, salt, and remaining 1/4 cup sugar in a bowl. Let sit, tossing occasionally, until juicy, 8 to 10 minutes.
Fill piecrusts with the fruit mixture (about a heaping 1/2 cup each). Place stars on pies as desired. Bake until fruit is bubbling and crust is golden brown, 30 to 35 minutes. Serve warm with ice cream.

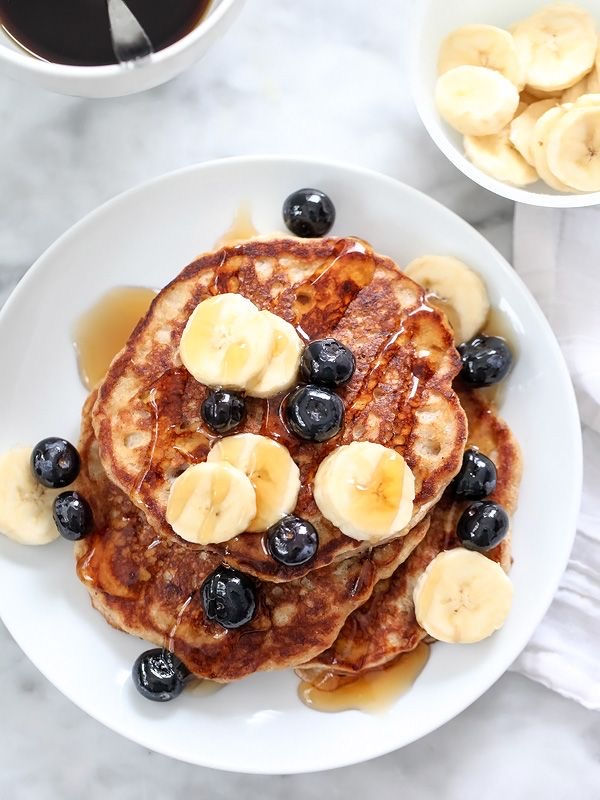
blueberry & banana pancakes
I love breakfast! It's my favorite! This pancake recipe is vegan, super easy & prefect for a light and healthy meal!
I hope you enjoy this recipe! If you decide to recreate these Blueberry & Banana Pancakes, tag me @katherinemcquade on Instagram and use the #KetchupWithKatherine! I would love the support and the opportunity to share your sweet treats!
Don't forget donate to my program "Promoting Hope: Potholders for Pancreatic Cancer Awareness" and I will send you a set of personalized potholders to use in your kitchen! Email me at info@katherinemcquade.com for all the details!
Happy Cooking!
xoxo, Katherine
June 13, 2020

INGREDIENTS:
1 ripe medium banana, just under ½ cup mashed
⅔ cup original Almond Milk
1 teaspoon vanilla
¾ cup flour
1 teaspoon baking powder (make sure it's fresh)
½ teaspoon cinnamon
⅛ teaspoon salt
¼ cup blueberries, plus more for topping
a few teaspoons coconut oil, for the pan
maple syrup, for serving
blueberry topping:
¼ cup blueberries, 1 banana + a drizzle of maple syrup + tiny pinch of salt
INSTRUCTIONS:
In a small food processor, puree the banana with the almond milk and vanilla. (or mash it really well by hand - you want it pretty liquified).
In a separate medium sized bowl, mix together the dry ingredients. Pour the banana/milk mixture into the dry ingredients and stir until just combined. Gently stir in the blueberries.
Heat a few teaspoons of coconut oil in a large skillet over medium heat. Using a ¼ cup measuring cup, scoop the pancake batter into the pan. Flip when bubbles form in the batter (about 1 minute). Let the second side cook for about 60 seconds and remove from heat.
For the blueberry topping, place blueberries in a small bowl with a little bit of maple syrup. Microwave for 20-30 seconds or until they burst a little.
Serve pancakes warm with blueberry sauce, fresh banana slices and maple syrup.
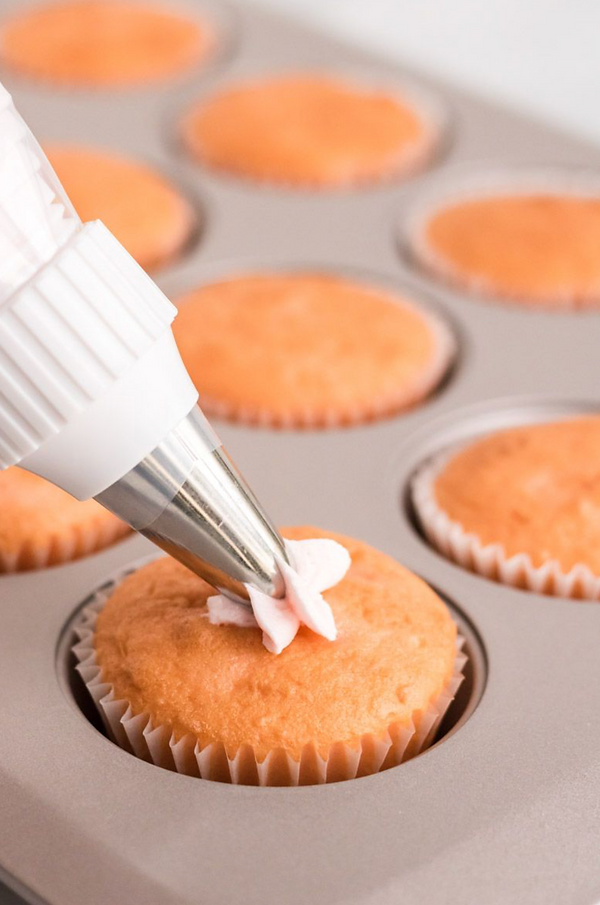
pink lemonade cupcakes
May 8, 2020
Summer is just around the corner and that means it’s time for ice cold lemonade! Check out these Pink Lemonade Cupcakes - A perfect summer sweet treat!
I hope you enjoy this recipe! If you decide to recreate these Pink Lemonade Cupcakes, tag me @katherinemcquade on Instagram and use the #KetchupWithKatherine! I would love the support and the opportunity to share your sweet treats!
Don't forget donate to my program "Promoting Hope: Potholders for Pancreatic Cancer Awareness" and I will send you a set of personalized potholders to use in your kitchen! Email me at info@katherinemcquade.com for all the details!
Happy Cooking!
xoxo, Katherine


INGREDIENTS:
1 cup unsalted butter, room temperature
2 cup sugar
Zest of 2 small lemons (or 1 large)
4 eggs
2 1/2 cup flour
1/2 cup cornstarch
1 tablespoon baking powder
1 teaspoon salt
1 cup sour cream
2 tablespoons milk
2 tablespoons freshly-squeezed lemon juice
1 1/2 teaspoons vanilla extract
1 cup unsalted butter, room temperature
1 teaspoons vanilla extract
1 teaspoon lemon zest, optional
3-4 cup powdered sugar
1/4 cup raspberry puree, jam, preserves (or 1 tablespoon raspberry jello powder)


INSTRUCTIONS:
Preheat oven to 350ºF and line pans with cupcake liners.
Beat butter, sugar and lemon zest together until light and fluffy. Add in eggs and mix until thoroughly incorporated.
In a large bowl whisk together flour, cornstarch, baking powder and salt. You can sift these ingredients together if you prefer a very light texture.
Add half the dry ingredients to the butter/sugar/zest and mix on medium speed. Then add sour cream, milk and lemon juice and mix again. Continue to add the rest of the dry ingredients. Scrape down the sides of the bowl after each new addition. Be careful to not over mix!
Evenly divide the batter between the 24 cupcake liners. Bake for 18-22 minutes or until an inserted knife or toothpick comes out clean. Let cupcakes cool.
To make frosting, beat butter for 1 minute. Add vanilla extract and lemon zest and 2 cup of powdered sugar. Then add your raspberries! (If you want to use the raspberry puree option just place a handful in a blender and blend until smooth. You can sift out the seeds if you want, and then add to the butter mixture. You can always add just a little of the jello powder to boost the flavor and color up a notch.) Continue to add as much powdered sugar as needed to reach your desired consistency!
Pipe onto cooled cupcakes and top with fresh raspberries!
the BEST birthday cake
April 26, 2020
Today I’m celebrating my 24th Birthday with the BEST Birthday Cake Recipe. A classic, soft, and fluffy funfetti cake loaded with colorful sprinkles and frosted with my favorite cream cheese frosting!
I hope you enjoy this recipe! If you decide to recreate these amazing bday cake recipe, tag me @katherinemcquade on Instagram and use the #KetchupWithKatherine! I would love the support and the opportunity to share your sweet treats!
Don't forget donate to my program "Promoting Hope: Potholders for Pancreatic Cancer Awareness" and I will send you a set of personalized potholders to use in your kitchen! Email me at info@katherinemcquade.com for all the details!
Happy Cooking!
xoxo, Katherine


INGREDIENTS:
birthday cake:
1 cup + 2 Tablespoons unsalted butter softened (265g)
3 cups granulated sugar 600g
3 large eggs room temperature preferred
1 Tablespoon vanilla extract
4 cups all-purpose flour 500g (may substitute 500g cake flour)
1 1/2 teaspoons baking soda
1 1/2 teaspoons baking powder
1 1/2 teaspoons salt
2 cups buttermilk room temperature preferred (475ml)
1/2 cup colorful sprinkles
cream cheese frosting:
3/4 cup unsalted butter softened (175g)
12 oz cream cheese softened (340g)
1 1/2 teaspoons vanilla extract
1/4 teaspoon salt
5 1/4 cups powdered sugar 656g


INSTRUCTIONS:
birthday cake:
Preheat oven to 350F (175C) and grease and flour the sides and bottom of three 8” or 9” baking pans. For extra security, I also recommend lining the bottom of each pan with a round of parchment paper cut to fit the bottom of the pan.
Add butter to the bowl of a stand mixer or to a large bowl. Use a paddle attachment on your stand mixer or an electric mixer to beat until smooth.
Add sugar and beat until well-combined.
Add eggs, one at a time, beating well after each addition.
Stir in vanilla extract.
In a separate bowl, whisk together flour, baking soda, baking powder, and salt.
Using a spoon or spatula (but NOT the electric mixer any longer) add about a fourth of the flour mixture (no need to measure, just eyeball it) to the butter mixture and stir until just combined.
Now add approximately ⅓ of the buttermilk and stir again until combined. Repeat alternating adding flour mixture and buttermilk until all ingredients are completely combined. Be sure to scrape the sides and bottom of the bowl.
Stir in sprinkles.
Evenly divide batter into prepared pan. Transfer to 350F (175C) oven and bake for about 28 minutes if using 9” pans and 32-34 minutes if using 8” pans, or until a toothpick inserted in the center of cake comes out clean or with a few moist crumbs.
Allow to cool in pan for 10 minutes then run a knife around the edge of the pan and carefully invert each layer onto a cooling rack to cool completely before frosting. While cakes are cooling, prepare frosting.
cream cheese frosting:
You will need a large bowl, this recipe makes a lot of frosting to cover all three layers of cake!
Combine butter and cream cheese in your stand mixer or in a large bowl with electric mixer and beat until creamy and well-combined.
Stir in vanilla extract and salt.
Gradually, with mixer on low-speed, add powdered sugar. Once all sugar has been added, be sure to scrape the sides and bottom of the bowl so that all ingredients are well-incorporated.